Being unemployed gives you a lot of time to work on side projects, spend time with family, and play video games. Here’s what I played in 2025. It’s a long one, buckle up!
Some highlights, if you don’t want to read all 3500 words 😅
Being unemployed gives you a lot of time to work on side projects, spend time with family, and play video games. Here’s what I played in 2025. It’s a long one, buckle up!
Some highlights, if you don’t want to read all 3500 words 😅
TL;DR: don’t use existentials where generics will do. Avoid existentials if at all possible in performance-critical code paths.
The North American NES is locked to 60 FPS. During each CPU tick, the PPU ticks three times, which means that if your emulator is too slow, not only will the frame rate suffer, but the entire game runs slower. This is in contrast to modern games, where elapsed time is the central control mechanism, not the FPS or number of clock ticks.
All this to say: emulator’s gotta run fast, or else everything falls apart.
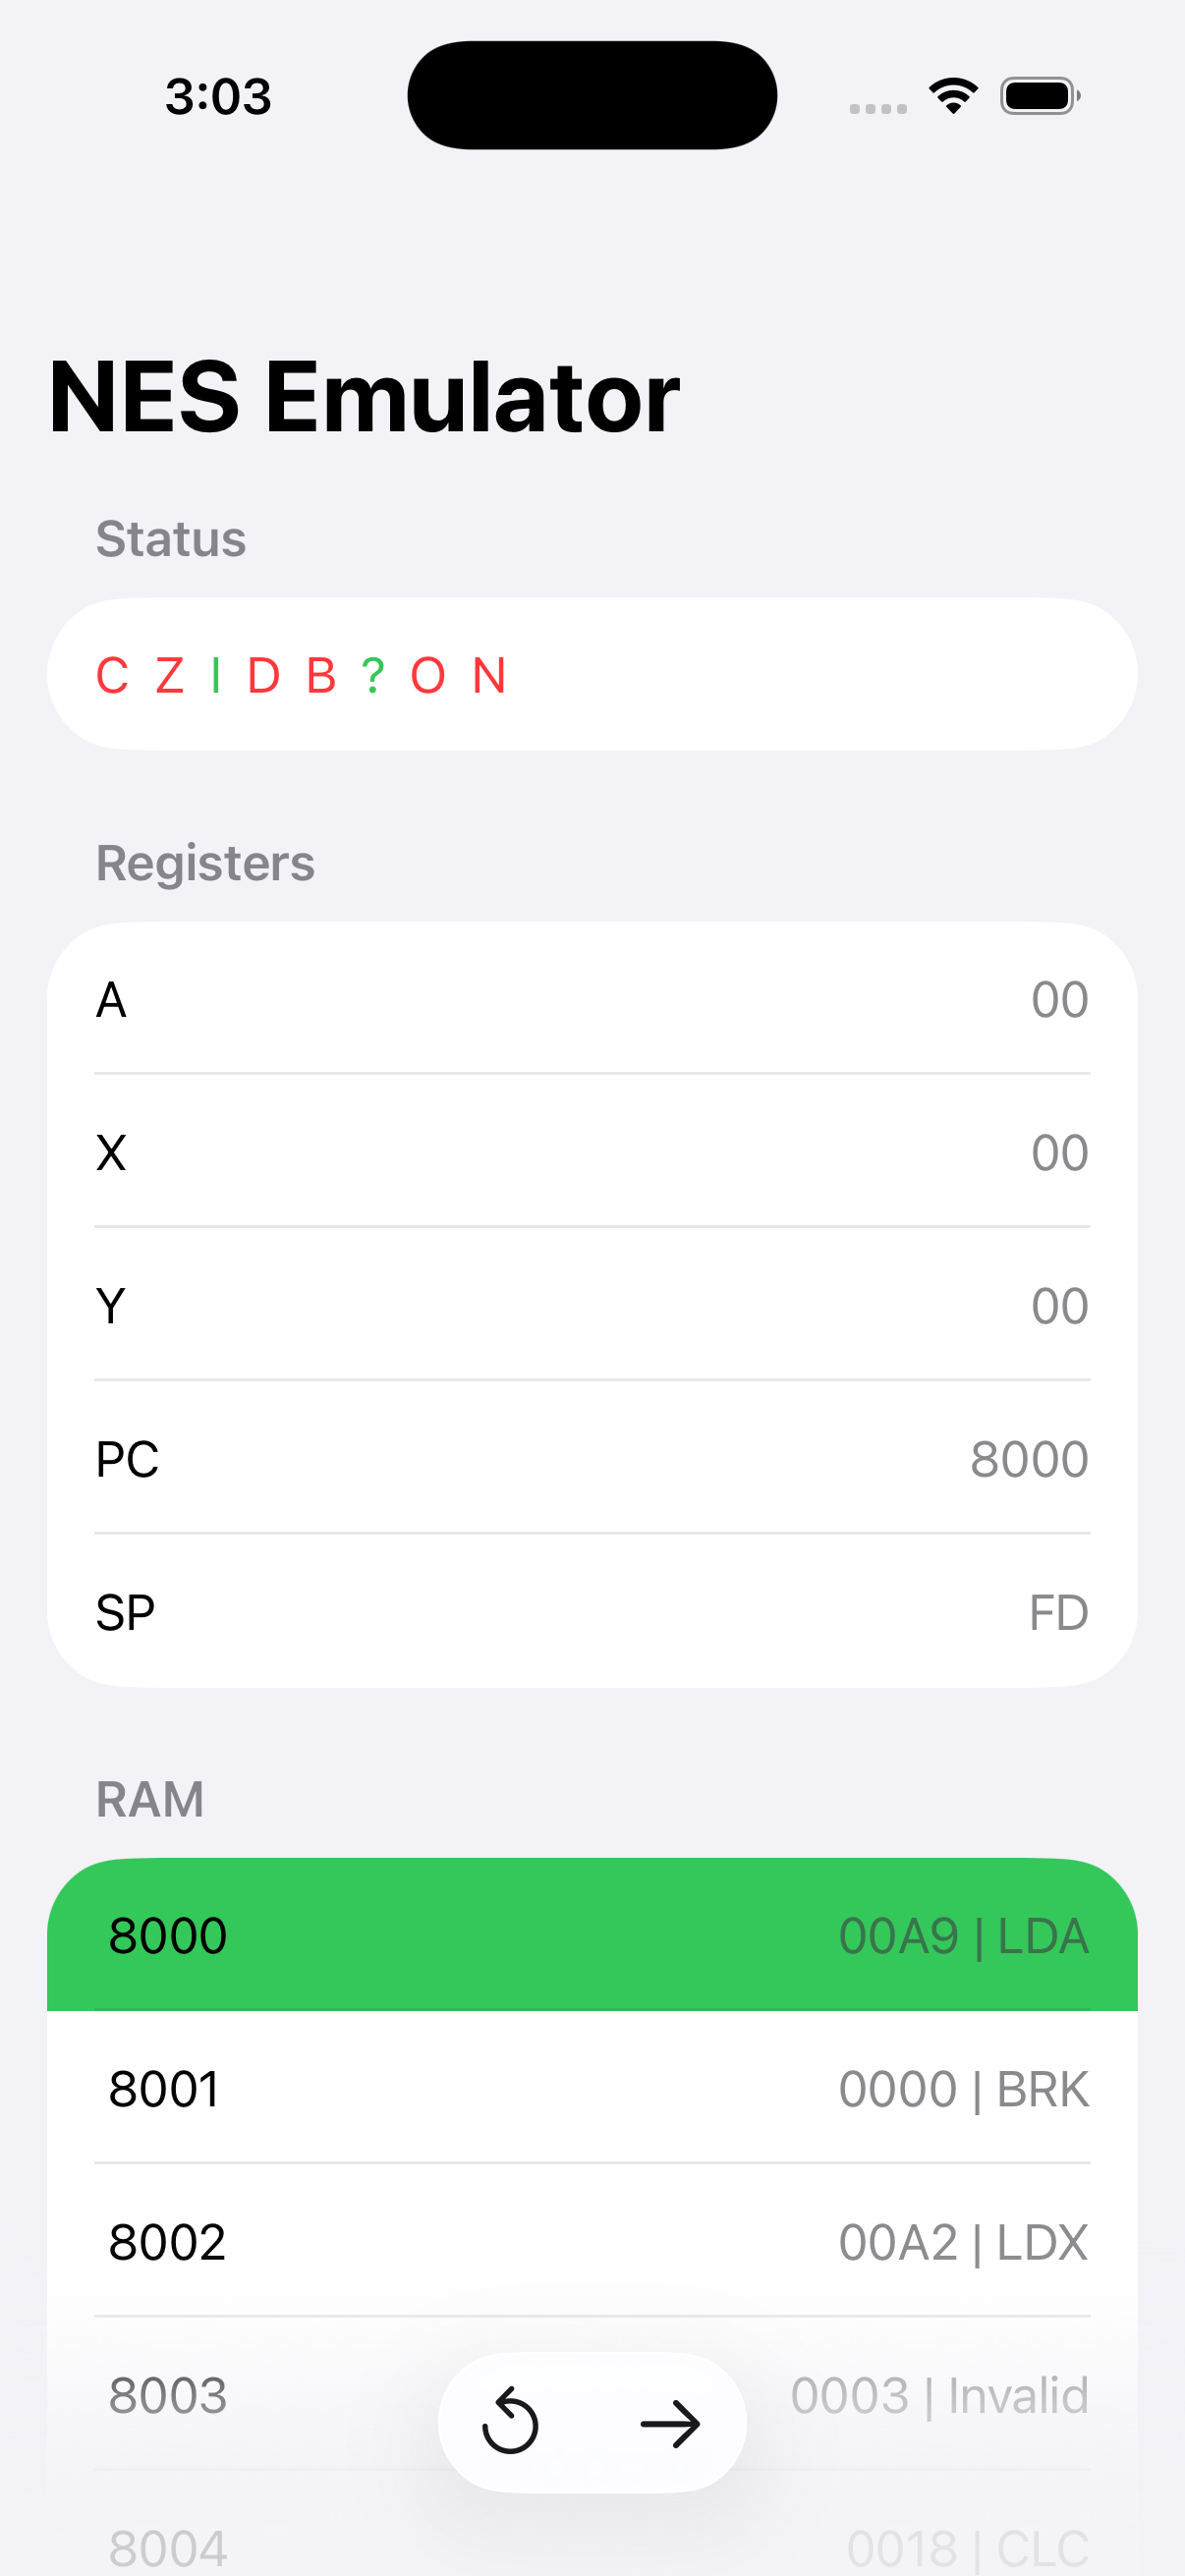
It probably shouldn’t have surprised me that the slowest thing in my emulator is memory access. But it’s just a 64kb address space, most of which is memory – how complicated could it be? There’s a bit more complexity: memory accesses are intermediated by a bus that determines which device services each access, and the cartridge is always given the opportunity to service a request even when it would normally go somewhere else. Pretty straightforward. The problem is: even when lots of data is being fetched, it happens one byte at a time, which means bus.read() gets called hundreds of thousands of times per second. It had better be fast!
My first approach was the Swiftiest: define a reusable Bus class that manages a list of entries, each of which contains a device conforming to Addressable, the starting address, and addressable length. A device might be a block of RAM or some memory mapped thing like PPU registers or game controllers. When a read or write happens on the bus, it searches for the right entry and calls its device’s read() or write() method.
Since there’s an array containing entries, and each entry’s device can be a different type conforming to Addressable, we have to use existentials. To oversimplify a bit, an existential (spelled var thing: any SomeProtocol in Swift) is a little type-erased box that can hold anything conforming to a given protocol. The benefit is that it’s super convenient and allows us to express things like heterogeneous arrays (or in our case, an array of things containing heterogeneous types). The downside is performance: since the concrete type of a value can’t be known at compile time, method calls on existentials must be dynamically dispatched. Which happens hundreds of thousands of times per second. Slow!
The solution is easy, but not as nice. I now have separate MainBus and PPUBus types which almost exclusively hold references to concrete types conforming to Addressable, and I’ve hardcoded the logic to read or write to each device based on their locations within the address space.
I got a huge performance win out of this!
Which reminded me: I was using existentials all over the place where generics would suffice. When there are no other downsides, you should always use generics instead of existentials. In many cases they do the exact same thing, but the concrete types are known at compile time and dynamic dispatch is avoided. Whew! It was an easy, mechanical fix.
Lastly, there’s still the question of the cartridge being able to step in to handle any memory read or write. That means each bus needs to hold a reference to the cartridge. Since there are hundreds of types of cartridges (although most games use one of a select few), that means I still need to use an existential (var cartridge: any Cartridge) in the buses! I could make the buses generic over the cartridge type (class MainBus<C: Cartridge> {}) but then each type that holds a reference to the buses would have to use an existential, or themselves be generic over the cartridge type. I did actually go down this rabbit hole briefly, before deciding it was making my code too ugly and annoying.
There are certainly ways to solve this last issue of the cartridge being an existential, but as of right now performance is acceptable, hitting 60 FPS on my test devices. I still have the APU to write, though, so I may have to address it later. We shall see!
I’m writing an NES emulator in Swift!
The NES uses a 6502 processor, which has 3 normal registers (a, x, and y) and defines its own instruction set of 56 instructions. That makes for a lot of little tiny implementations! Addition (ADC) and subtraction (SBC) are probably the most complex ones, with the latter taking me some two hours to figure out simply because it’s the first time since 2004(?) that I’ve had to think about binary math and two’s complements. Luckily (or annoyingly depending on your point of view) many of the instructions are nearly identical, especially the six “transfer” instructions, which just copy values between different registers.
While the obvious thing might have been to implement each instruction as a small function on my CPU class, I wanted to break each out into its own file to avoid making it a multi-thousand-line mess. Having each instruction implemented as its own struct also gives me the flexibility to turn each into a little state machine if I decide to make my emulator clock-accurate in the future. For the time being, each instruction fully executes on its first clock tick, and then the CPU just spins for the correct number of ticks before executing the next instruction. So my current implementation is duration-accurate, but not clock-accurate.
The Instruction protocol that each instruction conforms to just defines an execute method that takes the CPU as an argument. Since the instruction naturally needs to be able to fully access the CPU, one downside of this arrangement is that none of the CPU’s state can be declared private. The NES class is the only other code with a reference to the CPU, but it does expose it as public so that I can create some debugging UI with access to its registers. Maybe I can mitigate that with some module boundaries. We’ll see.
Because I have no idea what I’m doing (and because I hope the source can be a bit of a portfolio piece to show to potential employers), I wrote unit tests for each instruction and addressing mode.
One mistake I made is forgetting that of course some instructions write to memory! Since most of the instructions just read values and store results in registers, I had the CPU’s tick function use the current addressing mode to fetch the appropriate value and make it available to the instruction via a property on CPU before calling the instruction’s execute method. When I got to read-modify-write instructions like ASL, I let the instruction return a value from execute and then the tick function would use the addressing mode to write it back to where it came from.
But wait! There’s another complication! JMP actually needs to read two bytes from memory. (Addresses are 2 bytes long, but memory reads and writes only operate on a byte at a time.) This means I need to store the address from the addressing mode so that the instruction can read the extra byte from the following address.
I think sometime down the road instead of having the CPU’s tick method try to be smart and do these things, I’ll just pass the addressing mode into the instruction’s execute method and let it read and write exactly what it needs. Whoops!
I finally finished implementing all of the instructions and I’m on to the PPU, starting with its memory-mapped registers that are exposed on the CPU’s bus. Reading and writing these registers cause side effects within the PPU! More interesting times ahead! Stay tuned for more.
If you’re interested in following along you can find the code on Worktree.
I bought myself an Anbernic RG35XX Plus late last year and I’ve been enjoying going back and experiencing some of the video game history I missed when I was a kid. (My parents allowed computer use, but no game consoles!) I’ve primarily been playing old Nintendo stuff – some NES games like Super Mario Bros and a fan translation of the original Japanese Fire Emblem game, some SNES stuff (I played Chrono Trigger for the very first time this year, and wow is that a great game!), Pokemon Blue on Game Boy, and so on.
I’ve had a very (very) rough idea of how some of these systems worked, having seen videos about background vs sprite planes on NES and mode 7 on SNES. I even made a basic ROM hack of Dr Mario for my wife that replaced the “Dr Mario” graphic with “Dr Jason” and gave Mario myself a beard instead of a moustache.
On a lark a few days ago, I decided to try my hand at writing an NES emulator. I’ve never implemented anything approaching a virtual machine, and I thought it would be an interesting challenge to do it in Swift, given that most emulators tend to be written in C or C++. I found a good (albeit not comprehensive) series of videos on YouTube of someone building a basic emulator in C++, which gave me an overview of the system and a basis to get started, and I went off to the races!
Things will eventually get very complicated, but for now I just set up a bus with a CPU and some RAM on it, and I’ve been implementing all of the CPU instructions.
It’s obvious in retrospect, but I’d never considered that many instructions have more than one matching opcode! Each specifies a different way of reading or writing the data that the instruction operates on. There are several of these addressing modes, from using absolute raw addresses (Absolute) to indexing into a table of pointers and following the pointer to another memory location ((Indirect,X)). Each is relatively straightforward but some have easy-to-miss requirements like taking an extra clock cycle if an indexed address is in a different memory page than the base address.
I’m a little over half-way through all of the instructions, and looking forward to attaching more devices to the bus later like the cartridge, before tackling more difficult things like implementing the PPU, the chip that displays things on the screen. Interesting times ahead!
The code (such as it is) is on Github if you’re interested in following along.
I doubt I’m going to be posting any more Twitter-like short posts here anymore. You can find me on my Mastodon server: @json@micro.sadlerjw.com.